Beállítások
Utoljára frissítve: 2025. dec. 3.24 perc olvasásA beállítások menü minden felhasználó számára elérhető, mind a menedzserek, mind az operátorok számára, hogy testreszabhassák az M360 élményüket. A menedzserek számára egy további menü is elérhető, amely lehetővé teszi számukra, hogy irányítsák és zárolják a beállításokat az operátoraik számára. Egyes beállítások a PC alkalmazást érintik, mások az M360 mobilalkalmazást. A beállításokat el kell menteni, hogy érvénybe lépjenek, és a mobilhoz kapcsolódó beállítások akkor szinkronizálódnak, amikor egy eszköz csatlakoztatva van.
Operátor beállítások
Ha menedzser vagy, választhatsz alapértelmezett beállításokat az operátoraid számára, vagy kényszerítheted azokat. A legtöbb beállítás így módosítható, kivéve az alapvető beállításokat, mint például a kijelző méretezése. Az "Alapértelmezett" beállítás lesz kiválasztva az operátor számára, amikor először megnyitja a fiókját, de ezt később megváltoztathatja. A "Kényszerített" beállítás zárolva van, és az operátorok nem változtathatják meg.
Ezek a beállítások elkülönülnek a saját beállításaidtól, az egyik megváltoztatása nem változtatja meg a másikat.
További gombok:
- Alkalmazás az operátorokra - Ez lényegében a mentés gomb. Amikor megnyomod, a változtatásaid kiküldésre kerülnek az operátoroknak.
- Saját beállítások importálása - Átmásolja a személyes beállításaidat az operátor beállításokhoz
- Visszaállítás az utolsó alkalmazottra - Visszavonja a változtatásokat az "Alkalmazás az operátorokra" gomb utolsó megnyomása óta
Összes beállítás
Általános
Az általános beállítások az alkalmazás legalapvetőbb funkcióit tartalmazzák, mint például a megjelenítés és a nyelv.
Bejelentkezés
Automatikus bejelentkezés - Ha ez a beállítás be van kapcsolva, az M360 elmenti a bejelentkezési adataidat. Ezután minden alkalommal, amikor megnyitod a programot, azonnal bejelentkezik a legutóbbi fiókba, amelybe ezzel a beállítással jelentkeztél be.
Nyelv
Nyelv - Itt választhatsz az elérhető nyelvek közül, amelyen az M360 futni fog. Alapértelmezés szerint az M360 mobilalkalmazások azt a nyelvet használják, amely az eszközön be van állítva (ha elérhető), de ezt felülírja az itt választott nyelv, amikor csatlakoztatod az eszközt. A nyelv megváltoztatásakor újra kell indítanod az M360-at, hogy érvénybe lépjen.
Megjegyzés: Az alkalmazás nyelvének megváltoztatása megváltoztatja az exportálási nyelvet is, de ezt külön felül lehet írni az Exportálási beállításokban.
Dátum és idő
Az alkalmazáshoz választott dátum- és időformátum, amely felülírhatja a rendszer alapértelmezett beállítását. Ennek a beállításnak a megváltoztatása minden dátum- és időmegjelenítést érint, például az Eredményekben és Jelentésekben. A kiválasztó menü alatt mindig láthatod a választott formátum példáját.
Megjelenítés
Ablakméret és pozíció megjegyzése - Amíg ez a beállítás be van kapcsolva, az M360 pontosan ugyanabban a méretben és pozícióban nyílik meg, ahol bezártad. Ha ki van kapcsolva, akkor visszatér az alapértelmezett pozícióba.
UI méretezés - Ez a beállítás az M360 nagyítását állítja, megváltoztatva minden szöveg, gomb és képernyő méretét. Ez a beállítás csak a PC alkalmazást érinti, NEM a mobilalkalmazásokat.
Árnyékok - Kikapcsolhatod az árnyékok megjelenését a felhasználói felületen. Ez növeli a teljesítményt, a vizuális minőség rovására.
Egyszerűsített megjelenítési mód - A panelek és telefonkártyák számos lekerekített sarka és széle helyett négyszögletes formát használhatsz. Ez kissé növelheti a teljesítményt, vagy egyszerű vizuális preferencia lehet.
Animációk csökkentése - Teljesítmény okokból kikapcsolhatod a legtöbb animációt az M360 felhasználói felületén.
Pénznem
A pénznem beállítása befolyásolja a Készülék költségekben megjelenített értéket. Több pénznem is elérhető alapértelmezett opcióként, egyszerűen válassz egyet a listából. Beírhatsz bármilyen 3 betűs kombinációt is egyedi pénznemkód jelölésére.
Megjegyzés: A meglévő Készülék költség adatok nem frissülnek, amikor pénznemet változtatsz. Ha szeretnéd, hogy frissüljön, el kell távolítanod a készülék költség adatokat az eszközről, és újra be kell vinned az új pénznemmel.
Alapértelmezések visszaállítása
A "Törlés" gomb megnyomása minden beállítást visszaállít az eredeti, frissen telepített alapértelmezett értékekre. Ez magában foglalja a bejelentkezési adataid törlését, és azokat a választásokat is, amelyeket bizonyos értesítések végleges elrejtésére tettél.
Eszközök nézet
Az Egyéni nézet testreszabható, hogy csak a számodra releváns paneleket tartalmazza. Itt találod az ott megjeleníthető funkciók teljes listáját. Használd a jelölőnégyzeteket a funkciók kiválasztásához vagy kiválasztásának megszüntetéséhez. A Mindet kiválaszt gomb visszaállítja az alapértelmezett, teljesen kiválasztott listát.
Automatizálás
Az M360 különféle lehetőségeket kínál a munkafolyamatod bizonyos részeinek automatizálására. Egyes opciók kizárják egymást, de a legtöbb automatizálási beállítás együtt használható.
Eszköz csatlakoztatás
IMEI leolvasása a képernyőről (Android 12) - Bizonyos Android 12-es eszközök problémákat okoznak, amikor megpróbálod kiolvasni az IMEI értékeket. Ilyen esetekben, ha ez a beállítás be van kapcsolva, az M360 megpróbálhatja közvetlenül a képernyőről leolvasni az IMEI-t. Ez nem mindig működik, de ritkán van rá szükség, ezért ez egyszerűen egy tartalék opció.
EID leolvasása a képernyőről - A normál EID olvasás tartalékaként használhatod ezt az opciót, hogy megpróbáld a képernyőről leolvasni az EID-t az eszközről. Ez felugró EID adatokat jelenít meg az eszközön, ha lehetséges, amelyek aztán hozzáadódnak az Eszközinformációkhoz.
iOS automatikus telepítés kihagyás - Automatikusan futtatja a telepítés kihagyást a csatlakoztatott iOS eszközökön, átugorva a telepítési képernyőket. Válaszd ki a telepítési beállításokat a Telepítés kihagyás beállítások részben.
iOS automatikus adattörlés - Amíg ez a beállítás be van kapcsolva, minden csatlakoztatott iOS eszköz felajánlja az azonnali törlés futtatását. Továbbra is választhatod a megszakítást, hogy elkerüld a véletlen törlést.
iOS automatikus Find My iPhone / MDM ellenőrzés - Ezzel a beállítással megkaphatod a Find My iPhone és MDM állapot tényleges szerver értékét, amely eltérhet attól, amit az eszköz gondol. Ez a beállítás nem kompatibilis az iOS automatikus telepítés kihagyással, mivel ez a folyamat megváltoztatja az eszköz aktiválási állapotát.
Automatikus feketelistás ellenőrzés - Ha ez a beállítás be van kapcsolva, minden egyedi eszköz, amit csatlakoztatsz, automatikusan feketelistás ellenőrzésen megy keresztül az IMEI-je alapján. Egy olyan eszköz csatlakoztatása, amelyet már ellenőriztek, nem kerül újra ellenőrzésre.
Féléves feketelistás ellenőrzés - A fenti beállítással kombinálva, ha be van kapcsolva, az eszközök újra ellenőrzésre kerülnek, de csak ha több mint fél év telt el az előző ellenőrzés óta.
Mobilalkalmazás telepítése
Automatikusan telepíti a mobilalkalmazást minden eszközre, amit csatlakoztatsz, amennyiben még nincs telepítve az alkalmazás. Az eszköznek aktiválva kell lennie, hogy ez sikeres legyen.
Diagnosztika után
Alkalmazás eltávolítása - Automatikusan eltávolítja az M360 mobilalkalmazást az eszközről a diagnosztika befejezése után. A diagnosztikai eredmények mentésre kerülnek, mielőtt az alkalmazás törlődne.
Adattörlés végrehajtása - Automatikusan törli az eszközt a diagnosztika befejezése után. A diagnosztikai eredmények mentésre kerülnek, mielőtt az alkalmazás törlődne.
Eszköz észlelés
Samsung hibakeresés nélküli csatlakozás - Ezzel a beállítással engedélyezve csatlakoztathatod a Samsung eszközöket, amelyeken nincs bekapcsolva az USB-hibakeresés. A funkciók korlátozottak lesznek, és kevesebb adat jelenik meg az Eszközinformációk képernyőn. Diagnosztikát nem lehet futtatni ilyen eszközökön, de az osztályozás elérhető.
Figyelmen kívül hagyott eszközök - Amikor leválasztasz egy eszközt az Akciósávról, választhatod, hogy leválasztva tartod. Egy leválasztott eszköz így Figyelmen kívül hagyott eszközzé válik, megakadályozva, hogy az M360 újra betöltse. Minden figyelmen kívül hagyott eszköz itt lesz felsorolva, és eltávolíthatod őket a listáról a Törlés gomb megnyomásával.
Eszközinformációk
Eszközinformációk konfigurálása
Mind a tömörített, mind a teljes Eszközinformációk nézetben megváltoztathatod az adatok megjelenési sorrendjét. Húzd bármelyik elemet a listában a módosításhoz, majd mentsd el a beállításaidat a változtatások érvénybe léptetéséhez.
Az Egyéni nézetben, ahol az Eszközinformációk egy kisebb panelen jelennek meg, amíg meg nem nyitod, kiválaszthatod, hogy mely adatok jelenjenek meg. Használd a Csempéhez rögzítés alatti jelölőnégyzeteket, hogy hozzáadd vagy eltávolítsd az adatokat az Eszközinformációk kezdeti nézetéből.
Mind a rögzített lista, mind az adatok sorrendje visszaállítható az "Alapértelmezések visszaállítása" gomb megnyomásával.
Összefoglaló kártya
A telefonkártyák 1-3 adatot jeleníthetnek meg az Eszközinformációkból kiemelésként. Itt kiválaszthatod és átrendezheted ezeket. Nem lehet kevesebb mint 1, vagy több mint 3 kiválasztva.
Alacsony akkumulátor figyelmeztetési küszöb
Az eszköz akkumulátor-állapotának kiolvasásakor az akkumulátor jelző zöldre vagy pirosra válthat. Ha egészségesnek minősül, zölden jelenik meg, ellenkező esetben pirosra vált és figyelmeztet. Beállíthatod a pontos százalékot, amelytől kezdve túl alacsonynak minősül. Ha 0%-ra állítod, a figyelmeztetés gyakorlatilag kikapcsol.
Apple régiók
Minden Apple eszköz egy adott régióhoz van kijelölve. Bármelyik régiót kiválaszthatod "Nem preferáltként", ami miatt az eszközök figyelmeztetést adnak, ha abból a régióból származnak.
Diagnosztika
Ezek a beállítások lehetővé teszik bizonyos tesztek testreszabását az M360 mobilalkalmazásban. Amikor csatlakoztatsz egy eszközt, amelyen telepítve van az alkalmazás, ezek a beállítások elküldésre kerülnek és helyileg mentésre kerülnek. További információkért arról, hogy az egyes tesztek hogyan működnek, nézd meg: Részletes diagnosztika.
Általános
Sablon sorrend használata - Ez a beállítás alapértelmezés szerint be van kapcsolva, és azt eredményezi, hogy amikor egyéni sablonokat használsz, a diagnosztikai tesztek a sablon készítésének sorrendjében futnak. Ellenkező esetben a sorrend figyelmen kívül marad, és egy alapértelmezett sorrend kerül használatra.
Automatizált tesztek - Bizonyos tesztek automatikusan futhatnak a háttérben, miközben diagnosztikát végzel, győződj meg róla, hogy bekapcsoltad ezt a beállítást, ha szeretnéd ezeket engedélyezni. Ellenkező esetben ezek a beállítások manuálisan lesznek elérhetők. Ha egy teszt nem tud automatikusan befejeződni, továbbra is elérhető lesz manuálisan. További információkért arról, hogy mely tesztek automatizálhatók, lásd: Részletes diagnosztika.
Kezdőképernyők kihagyása - Az M360 oktatóképernyőkkel érkezik egyes tesztek előtt, hogy útmutatót nyújtson a működésükről. Ha mindig ki szeretnéd hagyni ezeket, kapcsold be ezt a beállítást.
Hang tesztek
Mind a mikrofon, mind a hangszóró teszthez 2 mód áll rendelkezésre. Az Automatikus az eszköz saját hangrendszerét használja hangok kibocsátására és rögzítésére, tesztelve azt továbbított kódokon keresztül, amelyeket helyesen kell megfejtenie a sikeres teszthez. A Manuális az alapértelmezett hangra, vagy az általad rögzített hangra támaszkodik, amely lejátszásra kerül, majd manuálisan értékeled.
- Alapértelmezés szerint mindkét teszt "Választás a teszt előtt, az alkalmazásban" értékre van állítva. Ez azt jelenti, hogy mindkét opció elérhető lesz az alkalmazásban minden alkalommal, amikor a teszt megnyílik.
- Az "Automatikus" vagy "Manuális" kiválasztása azt eredményezi, hogy csak a választott típus lesz elérhető a diagnosztika futtatásához.
Érintőképernyő teszt
Típus - Az érintőképernyő tesztnek 2 verziója van. A Teljes képernyős verzió teljes rácsot biztosít az eszköz képernyőjén a funkcionalitás ellenőrzésére az egész képernyőn. A Lite verzió ehelyett csak a képernyő széleit és kulcsfontosságú területeit teszteli, ami gyorsabb, de kevésbé alapos.
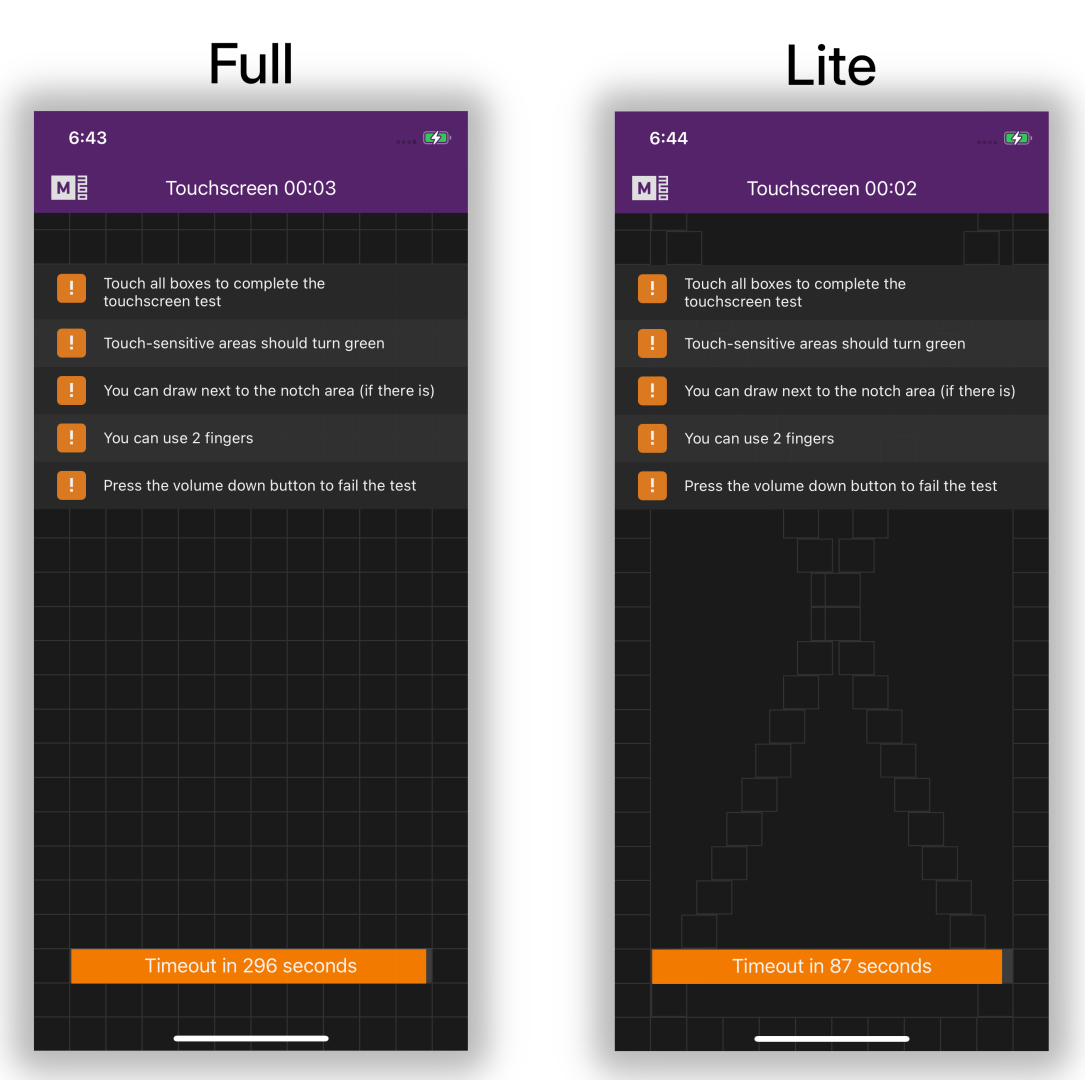
Időkorlát - Az érintőképernyő teszt befejezésének alapértelmezett időkorlátja 90 másodperc. Ha szeretnéd megváltoztatni ezt, kapcsold be az "Egyéni korlát használata" opciót. Ezután húzd a kört 10-300 másodperc között.
Hívás teszt szám
Telefonszám - A Hívás teszt megköveteli, hogy megadj egy telefonszámot a híváshoz a teszt során. Ahelyett, hogy minden alkalommal be kellene írnod egyet a tesztelés során, egyszerűen írhatsz ide egyet, és az készen áll a használatra a tesztben, amint megnyitod.
GPS teszt alapértelmezett hely
A GPS teszt megpróbálja megtalálni a helyzetedet és megjeleníteni azt számodra, normálisan meg kell erősítened, hogy helyes-e vagy sem. Automatizált tesztté alakíthatod ezt, ha előre megadod a helyzetedet koordináták segítségével, amelyeket az alkalmazás összehasonlíthat a talált értékekkel, automatikusan átmenve, ha közel vannak.
Teszt automatikus sikertelen, ha a hely nem egyezik - Normálisan a koordináták hozzáadása csak azt teszi lehetővé, hogy a teszt automatikusan átmenjen, nem pedig automatikusan sikertelen legyen, lehetővé téve, hogy manuálisan dönts, ha valóban hibás. Azonban bekapcsolhatod ezt, hogy a sikertelen eredmény is automatikusan megtörténjen, ha a koordinátáid nem egyeznek.
Koordináták keresése - Ennek a gombnak a megnyomása megpróbálja automatikusan megtalálni a jelenlegi hosszúsági és szélességi koordinátáidat a használathoz. Internetkapcsolatot igényel.
Pontossági küszöb - Beállíthatod a tényleges koordinátáid és az eszköz által talált értékek közötti maximális különbséget, amely még érvényesnek tekinthető. Ha ezen a tartományon kívül esik, a GPS teszt sikertelennek minősül.
Gyors tesztelés
iOS eszközök esetén a Gyors tesztelés azonnal befejezhet bizonyos teszteket a diagnosztika indításakor. Egyes tesztek részlegesen is befejezhetők, továbbra is segítve a diagnosztika felgyorsítását. Bekapcsolhatod, hogy használod-e egyáltalán ezt a funkciót, vagy egyenként kapcsolhatod be a következő teszteket a Gyors teszteléshez:
- Hardver gombok
- Akkumulátor
- Töltés
- Biometrikus érzékelő
- Gyorsulásmérő
- Giroszkóp
- Közelségérzékelő
- Fényérzékelő
- Mágneses érzékelő
- WiFi
- Bluetooth
- NFC
Megjegyzésként, a manuális tesztelés megbízhatóbbnak és pontosabbnak tekinthető, de a gyors tesztelés ésszerű rövidítést kínál.
Sablonok
Itt megtekintheted az egyéni sablonokat, amelyeket a Vezérlőpulton készítettél. Ha bármilyen változtatást végeztél, vagy újakat hoztál létre, nyomd meg a Frissítés a szerverről gombot, hogy a változtatások megérkezzenek az M360-ba. A kijelentkezés és újbóli bejelentkezés szintén frissíti ezt a listát.
Osztályozás
2 formátum áll rendelkezésre az osztályozáshoz az M360-ban. Ennek a beállításnak a megváltoztatása mind a PC alkalmazást, mind a csatlakoztatott eszközök mobilalkalmazásait érinti.
- Vizuális - Leíró ikonok 1-5 csillagos értékelési rendszerrel
- Betűk - Egyszerű, hagyományos A-F értékelési rendszer
Exportálás
Jelentés/CSV adat nyelve
Ez az összes exportáláshoz használt nyelv. Alapértelmezés szerint ez az M360 alkalmazás nyelvére van állítva, de itt külön felülírhatod.
Előnézet
A nyomtató beállítások módosítása közben láthatod a jelentés egyszerűsített megjelenítését. Megnyomhatod a Teszt nyomtatás gombot is, hogy lásd a jelentés tényleges verzióját, a választott módon nyomtatva. A jelentés helykitöltő adatokkal van kitöltve.
Nyomtató beállítások
Ezek a beállítások a Jelentés nyomtatást érintik, amely A4-es papírt igényel. A címkékhez nézd meg a Címke nyomtatás beállításainak dokumentációját.
Nyomtató - Válassz nyomtatási módszert. Minden nyomtató, amelyet hozzáadtál a számítógépedhez, itt jelenik meg, valamint ezek az alapértelmezett opciók:
- Minta PDF megtekintése - Gyorsan megnyitja a jelentés PDF-jét az alapértelmezett PDF-megjelenítő programodban
- OneNote - Elküldi a jelentést a OneNote alkalmazásodba, ha elérhető
- Microsoft Print to PDF - Elmenti a fájlt PDF-ként, mintha nyomtatná
Nyomtatási minőség - Itt választhatsz nyomtatási DPI-t, a kiválasztott nyomtatási módszerhez elérhető DPI-k alapján.
Példányok - Egyszerre több példányt is nyomtathatsz egy jelentésből
Kétoldalas - A jelentés második oldalát az előző oldal hátoldalára nyomtatja, nem pedig új lapra.
Színes - Ha kikapcsolod, a jelentések fekete-fehérben nyomtatódnak.
Jelentés tartalom
Beállíthatod, hogy milyen adatok kerüljenek exportálásra a jelentésekbe. Az Eszközinformációk mindig jelen vannak, de az összes többi panel opcionálisan eltávolítható:
- SIM zár eredmény
- OEM ellenőrzés
- Eszköz költségek
- Diagnosztika
- Osztályozás
- Osztályozási fotók
- Adattörlés/Törlés flash-sel
Eredmény exportálási beállítások
Előtag - Választhatod, hogy automatikusan előtagot adsz az exportált fájlok neveihez. Ez lehet az adott eszköz IMEI-je, vagy az Egyedi azonosító a Ragadós adatokból
Alapértelmezett útvonal -Exportáláskor mindig kéri, hogy válassz mentési helyet a mentendő fájlokhoz. Itt beállíthatsz egy alapértelmezett útvonalat, ahová ezek a jelentések mentésre kerülnek. Ha üresen hagyod, az alapértelmezett hely az lesz, ahová legutóbb mentettél egy fájlt.
CSV exportálási struktúra beállítások
Az eszközről elérhető összes adat exportálható CSV-ben, ahol Sorokba vagy Oszlopokba rendezve lesz, a választásodtól függően. Bekapcsolhatod azt is, hogy szeretnél-e fejléceket minden adatkészlethez, amelyek jelzik, hogy mi az egyes adatkészlet.
Címke nyomtatás
Ebben a menüben megtekintheted, szerkesztheted és kezelheted a címkesablonjaidat, beleértve az alapértelmezetteket is. Nyomd meg a Új létrehozása gombot a Címketervező megnyitásához és egyedi címke készítéséhez. Ha rákattintasz egy címkére, a következőket láthatod:
- Előnézet - Ha semmi sincs kiválasztva, a "Kérlek, válassz egy címkesablont a listából" szöveget látod. Ha egy címke ki van választva, annak előnézetét látod.
- Beállítás alapértelmezettként/Alapértelmezett - Amikor címkét választasz exportáláshoz, az alapértelmezett automatikusan kiválasztásra kerül először a listából. Láthatod, ha egy címke alapértelmezettként van beállítva a neve melletti rózsaszín csillag alapján, valamint a "Beállítás alapértelmezettként" gomb egyszerűen "Alapértelmezett"-re változik. Nyomd meg a Beállítás alapértelmezettként gombot, hogy az alapértelmezettet a jelenleg kiválasztottra változtasd.
- Teszt nyomtatás - Ennek a gombnak a megnyomása a jelenlegi nyomtatási beállításokat használja, és kinyomtatja a címkét helykitöltő adatokkal.
- Szerkesztés - Megnyitja a Címketervezőt a jelenleg kiválasztott címke szerkesztéséhez
- Törlés/Elrejtés - Az egyéni sablonokhoz egy Törlés gombot látsz, amely véglegesen eltávolítja a sablont (megerősítés után). A beépített sablonokhoz ehelyett egy Elrejtés gombot látsz, amely eltávolítja azt a sablont az exportálási lehetőségek közül. Mindig választhatod, hogy később újra megjeleníted a sablont.
- Margók - Itt állíthatod be a sablon nyomtatási margóit. Győződj meg róla, hogy elmented a beállításaidat a változtatások után, hogy azok ténylegesen érvénybe lépjenek!
- Nyomtató beállítások - Válassz nyomtatót vagy nyomtatási módszert, és válassz opciókat hozzá. Megnyomhatod a Frissítés gombot, hogy megtaláld a nemrég hozzáadott nyomtatókat.
- Alkalmazás MINDEN címkére - Ennek a gombnak a megnyomása átmásolja az összes nyomtató és margó beállítást az összes többi címkére.
Eszköz azonosítás
Ha egyszerre több eszközzel dolgozol, hasznosnak találhatod, hogy gyorsan azonosíthasd, melyik melyik a telefonkártyák kezelésekor. Az Akciósávban érhető el.
Megjelenítés a diagnosztika befejezésekor - Ennek az opciónak a bekapcsolása automatikusan megjeleníti az azonosítási képernyőt minden olyan eszközön, amelyen a diagnosztika befejeződött.
Automatikus bezárás időtúllépés után - Választhatod, hogy az eszköz azonosítási képernyő eltűnjön egy megadott másodpercszám után, amelyet a jelölőnégyzet alatt állíthatsz be.
Információ/Megjelenítési mód - Itt testreszabhatod, hogy milyen adatok jelenjenek meg az eszköz azonosítási képernyőn és milyen formátumban. Nyomd meg a "+" ikont további információk hozzáadásához, vagy a kuka ikont egy törléshez.
Illesztőprogram kezelő
Ha rendszergazdaként futtatod a programot, használhatod az Illesztőprogram kezelőt illesztőprogramok telepítéséhez és eltávolításához közvetlenül az M360-ból. Itt láthatod az egyes illesztőprogramok jelenlegi állapotát, hogy telepítve vannak-e és milyen verzióban.
Egyszerre több illesztőprogramot is kiválaszthatsz, vagy mindet egyszerűen a Mindet kiválaszt gomb megnyomásával. A jobb alsó sarokban lévő telepítés és eltávolítás gomb több illesztőprogram egyszerre történő kezelésére szolgál. Alternatívaként megnyomhatod a Telepítés/Eltávolítás gombokat minden illesztőprogram mellett egyenként.
Port kezelő
Amikor eszközt csatlakoztatsz az M360-hoz, az egy portszámot kap, amely segít azonosítani, hogy melyik USB porthoz van csatlakoztatva az eszköz. Itt testreszabhatod ezeknek a portoknak a címkéit. Az egyéni portok eltávolításához nyomd meg a törlés gombot mellettük.
A Port kezelő élőben frissül, így mindig láthatod az összes csatlakoztatott eszközt és azok portjait.
Telepítés kihagyás
Vezeték nélküli hálózat
Bizonyos tesztek internetkapcsolatot igényelhetnek az eszközökön. Ahelyett, hogy minden eszközön manuálisan kellene beírnod a WiFi adatokat, itt megadhatsz egyet, amelyet automatikusan használhatsz a legtöbb Android eszközön, és iOS WiFi profilokat is feltölthetsz. Nyomd meg a "Hálózat kiválasztása" gombot egy olyan hálózat kiválasztásához, amely már el van mentve a számítógépeden, vagy manuálisan is beírhatod az adatokat alul.
Ideiglenes profil - iOS WiFi profilok esetén választhatod, hogy azok automatikusan eltávolításra kerüljenek az eszközökről 1 órával a telepítésük után.
Android telepítés kihagyás (QR előkészítés)
USB hibakeresés engedélyezése - Az android telepítés kihagyás automatikusan bekapcsolhatja az USB hibakeresést, ha ez a beállítás engedélyezve van.
Apple aktiválás és telepítés
WiFi profil feltöltése - Ha vannak mentett WiFi adataid, feltöltheted azokat az Apple telepítések segítésére.
Telepítési választások - Válaszd ki az Apple eszköz nyelvi és régiós beállítását, amelyet szeretnél. Alapértelmezés szerint minden telepítési képernyő kihagyásra kerül, de ha bármelyiket manuálisan szeretnéd beállítani, kikapcsolhatod a jelölőnégyzetet.
Licencek
További információkért arról, hogy a licencek hogyan működnek, nézd meg a Licenc GYIK-et.
Licenc részletek - Itt láthatod a fiók jelenlegi licencét és annak részletes információit. A "Feliratkozás kezelése" gomb megnyomása a online vezérlőpultodra visz. A "Részletek frissítése" frissíti a licenc információidat, ha bármilyen változtatást végeztél a vezérlőpulton keresztül. A kijelentkezés és bejelentkezés szintén frissíti ezt az információt.
Licenc frissítések - Itt megtekintheted a frissítéseidet, valamint azok részleteit. Frissítések vásárlásához látogass el az áruház oldalunkra.
Elérhető tokenek - Itt megtekintheted az elérhető tokeneket a jelenlegi licenceddel, amelyeket a vonatkozó eljárások végrehajtásakor használsz. A tokenek nem vihetők át a licenc megújításai között, visszaállnak az eredeti maximális értékükre. A frissítésekkel vásárolt tokenek azonban megmaradnak, amíg fel nem használod őket.
Csatlakoztatott számítógépek - A licenc típusától függően több számítógépet is csatlakoztathatsz a licencedhez. Itt megtekintheted, hogy mely számítógépeket csatlakoztattad, és leválaszthatod őket, ha szeretnéd.