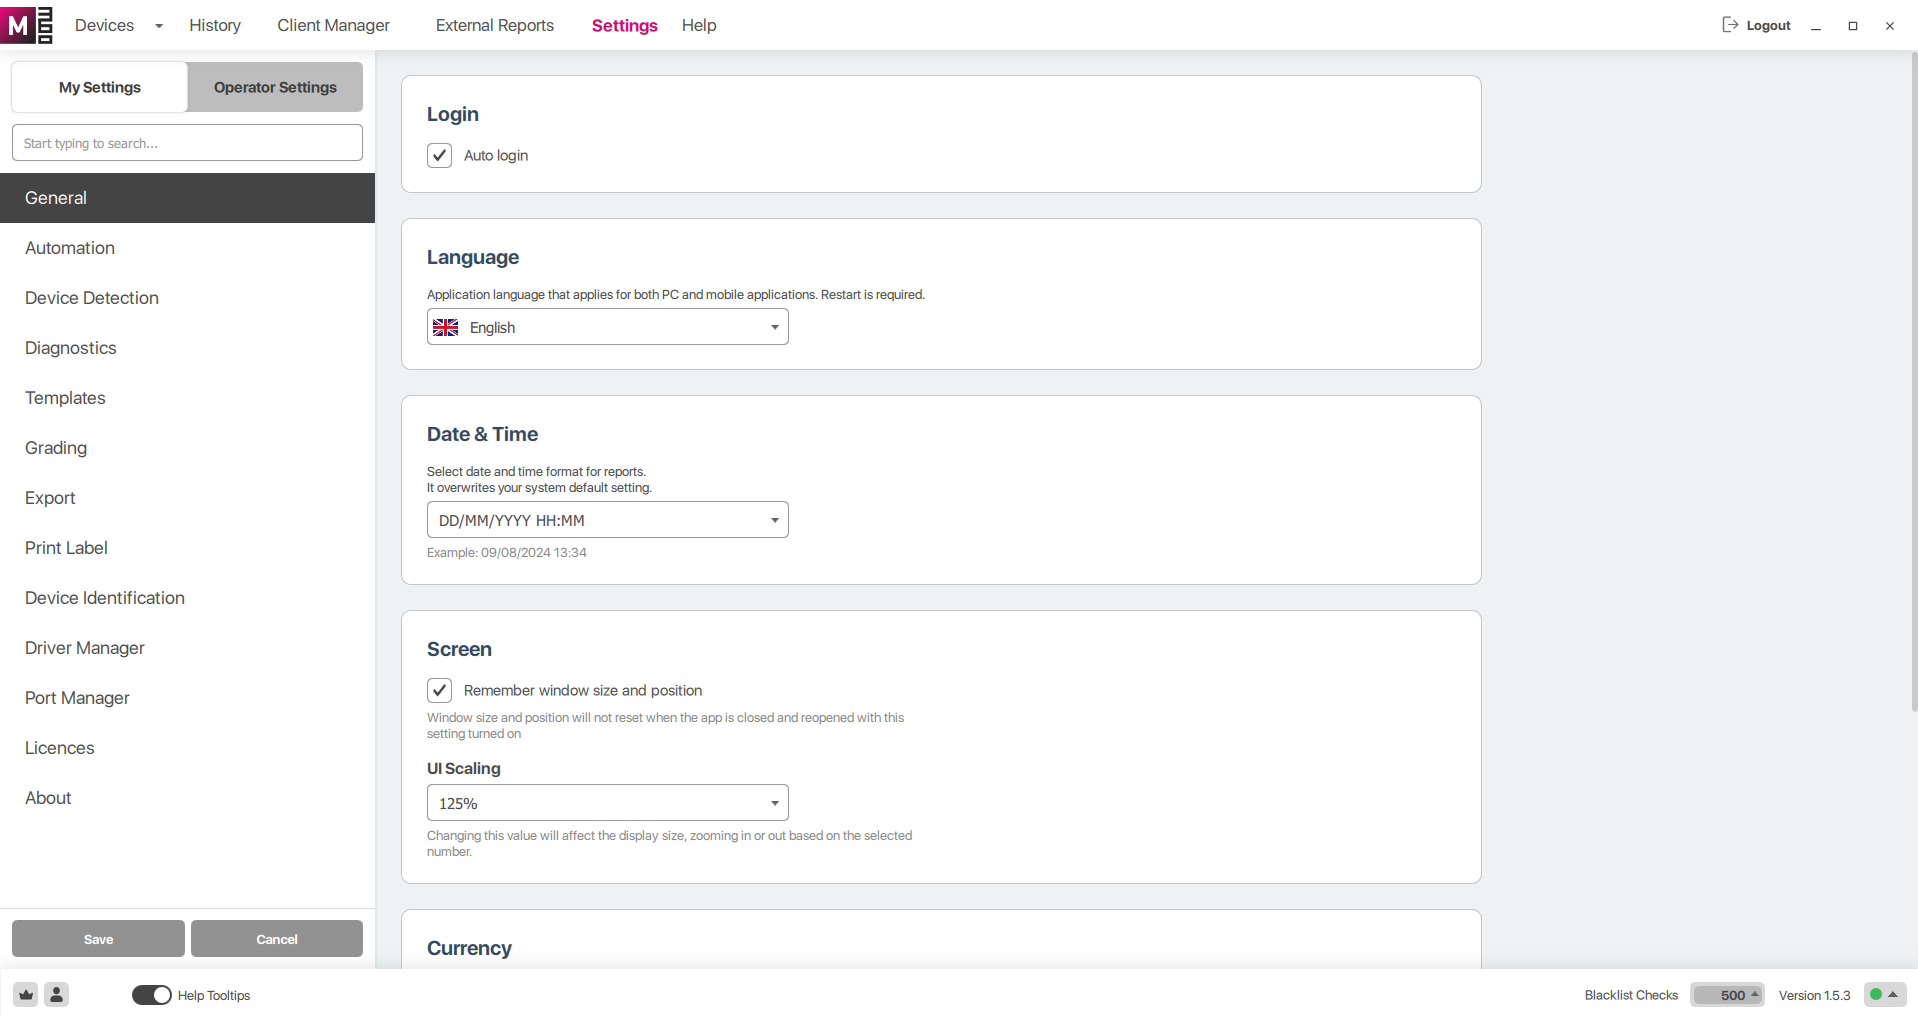
Settings
Last updated on Dec 3, 202517 mins readM360 comes with numerous extra features that aren’t necessarily active by default, as well as fine tuning controls to customize your experience. After making any changes to your settings, you must press the Save button located in the bottom left to confirm changes, otherwise your changes do not come into effect. Whilst you have unconfirmed change, the Save button will be active, and there will be a pink dot above the settings menu to warn you. Attempting to close the program with unsaved changes will also warn you with a notification.
The settings you set here can not only affect the M360 PC app, but also any device you connect which has the M360 mobile app. Settings for Diagnostics, Grading, Device Identification, as well as some others are all automatically synchronized with any such device upon connection. Such settings are kept even after you disconnect the device, as the mobile app saves them.
My Settings
The primary page within settings is your own personal one. The following setting groups are available:
General
Your general settings consist of the most basic functions of the app:
Login
Auto Login - If this setting is turned on, M360 will save your login information. Then, each time you open the program it will immediately log into the latest account which was logged in with this setting turned on.
Language
Language - Here you can select from our available languages for M360 to run in. By default, the M360 mobile apps use whatever language is set on the device (if available), but that is overwritten by whatever language you choose here when you connect the device. When changing languages, you will have to restart M360 for it to take effect.
Note: Changing your app language also changes your export language, but this can be overwritten separately in your Export settings.
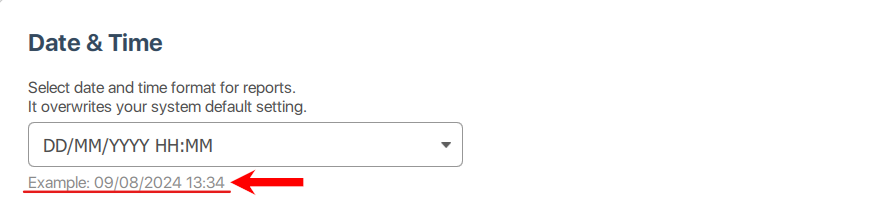
Date & Time
Your chosen date and time format for the application, which can overwrite your system default. Changing this setting affects all instances of date and time, such as on Results and Reports. Below the selection menu you can always see an example of your chosen format.
Screen
Remember window size and position - So long as this setting is turned on, M360 will open at the exact same scale and position it was closed at. If turned off, it will instead return to a default position.
UI Scaling - This setting adjusts the zoom of M360, changing the size of all text, buttons, and screens. This setting only affects the PC app, NOT the mobile apps.
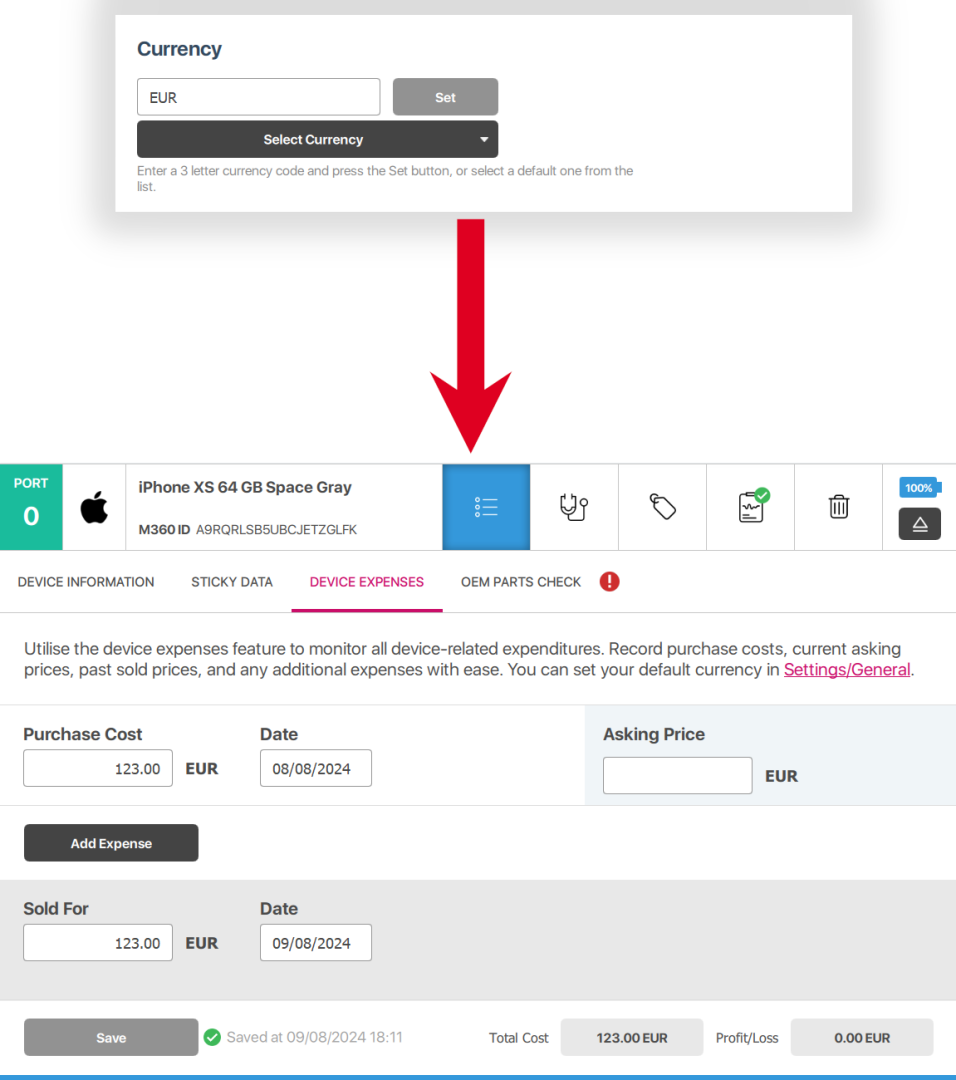
Currency
Your currency setting affects the displayed value in Device Expenses. Several currencies are available as default options, simply select one from the list. You can also write in any 3 letter combination to denote a custom currency code.
Note: Existing Device Expense data will not be updated when you change currencies. If you would like it to update, you will have to remove the device expense data from a device, and input it again with the new currency active.
Restore Defaults
Pressing the “Clear” button restores all settings to their original, freshly installed default values. This includes clearing your login details, and choices you made to hide certain notifications permanently.
Automation
M360 provides a variety of options for you to automate certain parts of your workflow:
Device Connection
Read IMEI from screen (Android 12) - Certain Android 12 devices cause issues when attempting to read the IMEI values from them. In such cases, if this setting is turned on, M360 can attempt to read the IMEI directly from the screen. This does not always work, but is also rarely needed, therefore this is simply a backup option.
Push iOS WiFi Profile - In your Diagnostics settings, you can input a WiFi network to be used by devices that you connect. However, by default that only works on Android devices. This setting allows M360 to push those WiFi details to iOS devices as a “profile”. When connecting an iOS device with this setting turned on, if successful, you will see a notification on the device about a profile having been downloaded. Head over to that device’s settings, and follow the on-screen prompts to install the profile. Using this, you can skip having to manually write in your WiFi details on each device, but you will still have to navigate to their settings.

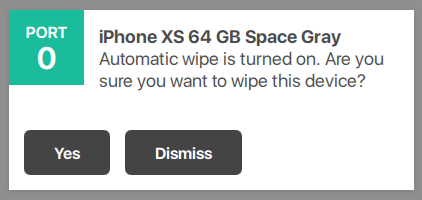
iOS Auto Wipe - For those preferring to wipe devices before working with them, you can automatically do so for iOS devices. Even if this setting is turned on, you will still be prompted to confirm, making sure you do not accidentally wipe a device you did not intend to.
Auto Blacklist Check - With this setting turned on, each unique device you connect will automatically have their IMEI used in a Blacklist Check. Connecting a device which has already been checked will not be re-checked.
Half-year Blacklist Check - In combination with the setting above if it is turned on, devices will now be re-checked, but only if more than half a year has passed since its previous check.
Install Mobile App
Right after a device is connected - Automatically installs the mobile app on any device you connect, so long as it doesn’t already have the app installed.
When diagnostics screen is selected - Automatically installs the mobile app when you click into the Diagnostics Screen for a device.
After Diagnostics
Open Reports - With this setting turned on, the Export menu will be opened automatically after completing diagnostics for a device.
Note: If you complete several diagnostics, they will open different export menus, closing the previous one. Only one device’s data can be exported at a time with this setting.
Uninstall App - If you wish to remove the app after completing tests, you can automatically do so with this option. After the app uploads the finished diagnostics data to M360, the app will remove itself.
Device Detection
Additional options for connecting devices in special circumstances:
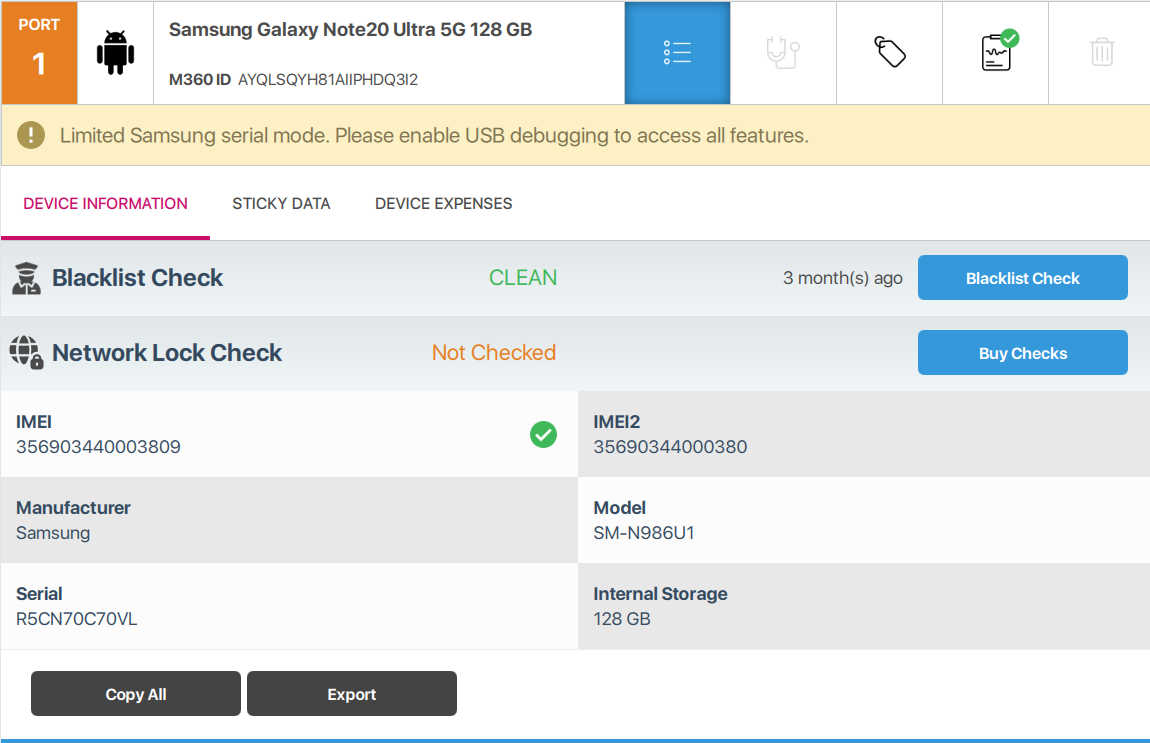
Samsung Debugging-Free Connection - With this option, you can connect samsung devices even if they do not have USB-Debugging turned on. The Device Information you gain from such a device will be limited, and most other operations will be unavailable for the device. All data of the device will be handled as normal, and will be available in your history.
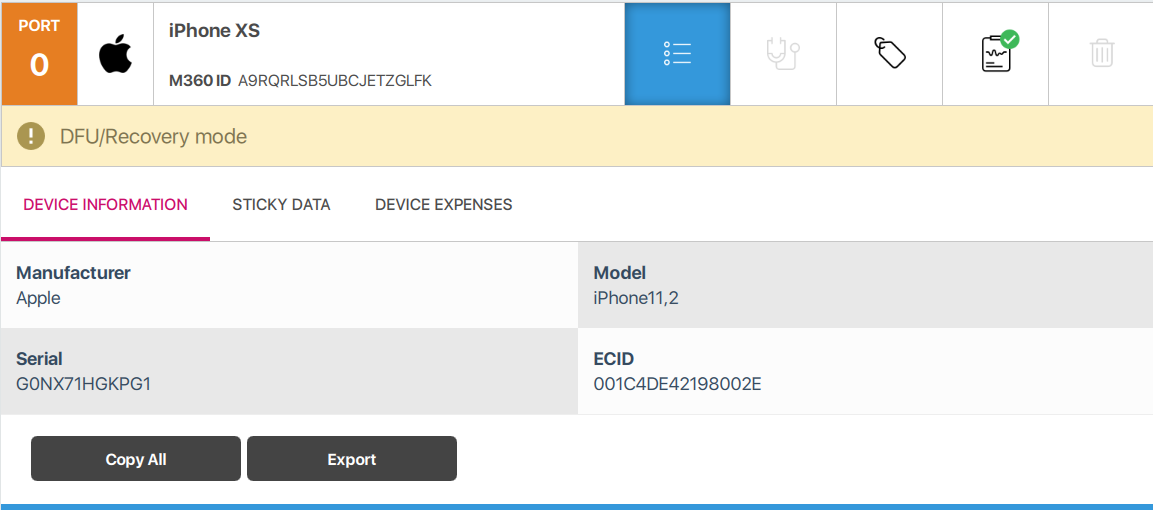
iOS DFU Mode - With this option, you can connect iOS devices even if they are in DFU or Recovery mode. Most device information will be available, but no testing is possible in these modes.
Diagnostics
These settings allow you to customize certain tests for the M360 mobile app. When you connect a device with the app installed, it will be sent these settings and save them locally. For more information on how each test actually works, check out: In-Depth Diagnostics.
Generic
Use template order - This setting is turned on by default, and makes it so that when you use custom templates, the diagnostic tests run in the order the template was made in. Otherwise, the order is ignored and a default one is used.
Automated tests - Certain tests can run in the background automatically while you are performing diagnostics, make sure to turn this setting on if you want those enabled. Otherwise, those settings will be available to complete manually. If a test fails to complete automatically, it will still be available to do manually. See more information on which tests can be automated at: In-Depth Diagnostics.
Skip start screens - M360 comes with instructional screens before some tests to provide a tutorial on how they function. If you wish to always skip these, turn on this setting.
Audio Tests
For both the microphone and speaker test, 2 modes are available. Automatic uses the device’s own audio system to emit and record sounds, testing it through transmitted codes that it must decipher correctly to pass. Manual relies on default audio, or audio recorded by you, which is played back and then evaluated manually by you.
- By default, both tests are set to “Choose before testing, in the app”. This means both options will be available in the app each time the test is opened.
- Choosing “Automatic” or “Manual” will make it so only the chosen type is available to run diagnostics with.
Touchscreen Test
Type - There are 2 versions of the Touchscreen test. The Full-screen version provides a full grid on the device’s screen to check functionality all across it. The Lite version instead provides testing for just the borders and key areas of the screen, which is faster but less thorough.
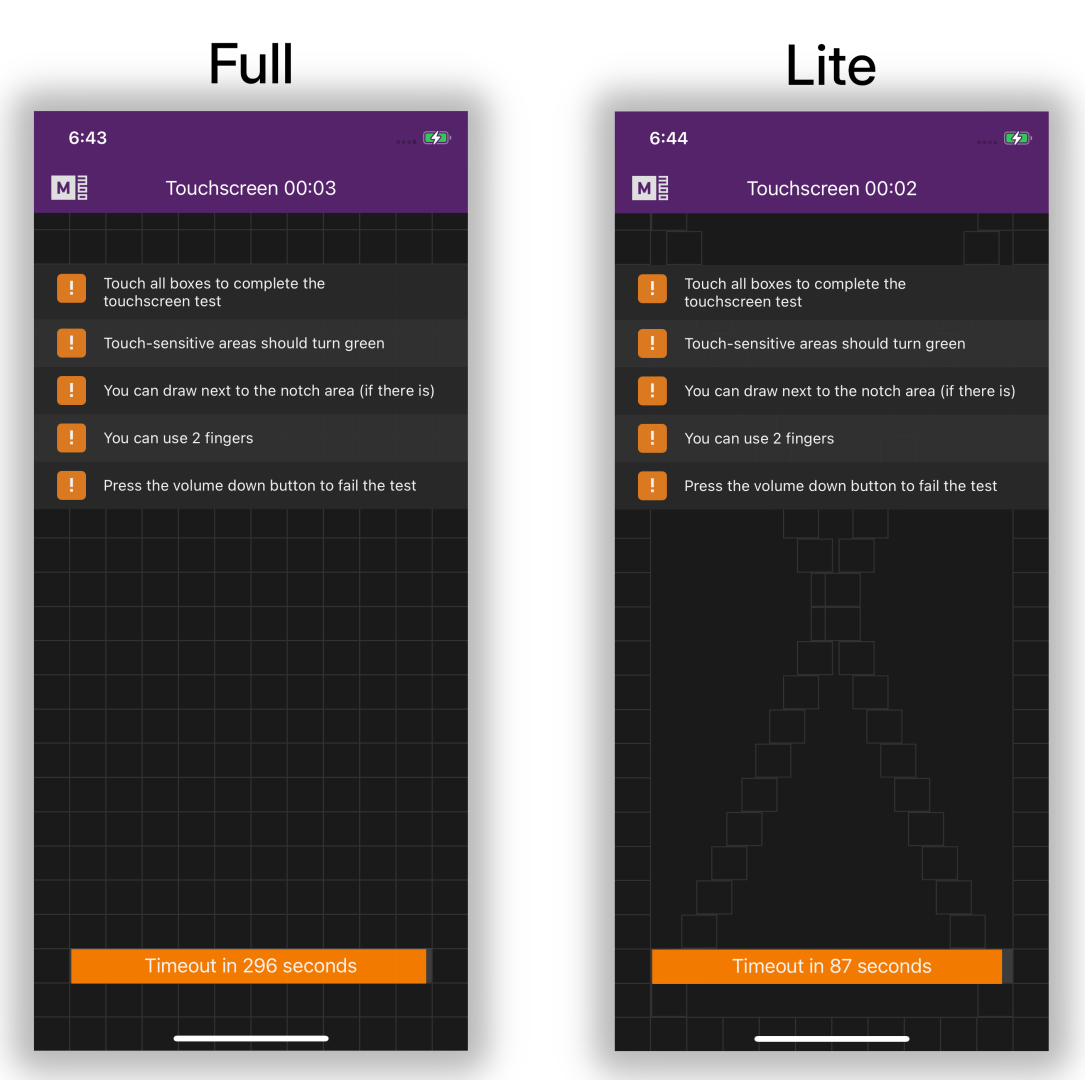
Time Limit - The default time limit for completing a touchscreen test is 90 seconds. If you would like to change this, turn on “Use custom limit”. Then, drag the circle between 10-300 seconds.
Call Test Number
Phone Number - The Call Test requires you to input a phone number to call during it. Rather than having to input one each time during testing, you can simply write on here and it will be ready to use in the test the moment you open it.
Wireless Network
Certain tests may require an internet connection on your devices. Rather than having to input WiFi details on each device manually, you can enter one here to automatically use on most Android devices, and to be able to push iOS WiFi profiles. Press “Select Network” to select a network that is already saved on your computer, or you can manually write in the details below.
Temporary Profile - For iOS WiFi profiles, you can choose to have them be automatically removed from devices 1 hour after having installed them.
GPS Test Default Location
The GPS test attempts to find your location and display it to you, normally needing you to confirm whether it is correct or not. You can turn this into an automated test by providing your location in advance via coordinates, which the app can then compare to the values it finds, automatically passing if they are close.
Automatically fail test if location doesn't match - Normally, adding coordinates only allows the test to automatically pass, not automatically fail, letting you decide manually if it really is wrong. You can however turn this on to allow failing to happen automatically as well if your coordinates don’t match.
Find Your Coordinates - Pressing this button attempts to automatically find your current longitude and latitude coordinates to use. Requires internet connection.
Accuracy Threshold - You can set the maximum difference between your actual coordinates and what a device finds that is considered valid. If outside of this range, it is considered a fail for the GPS test.
Templates
Here you can view your custom templates that you have made on your Dashboard. If you made any changes, or created new ones, you can press Update From Server to have the changes arrive to M360. Logging out and logging back in also updates this list.
Grading
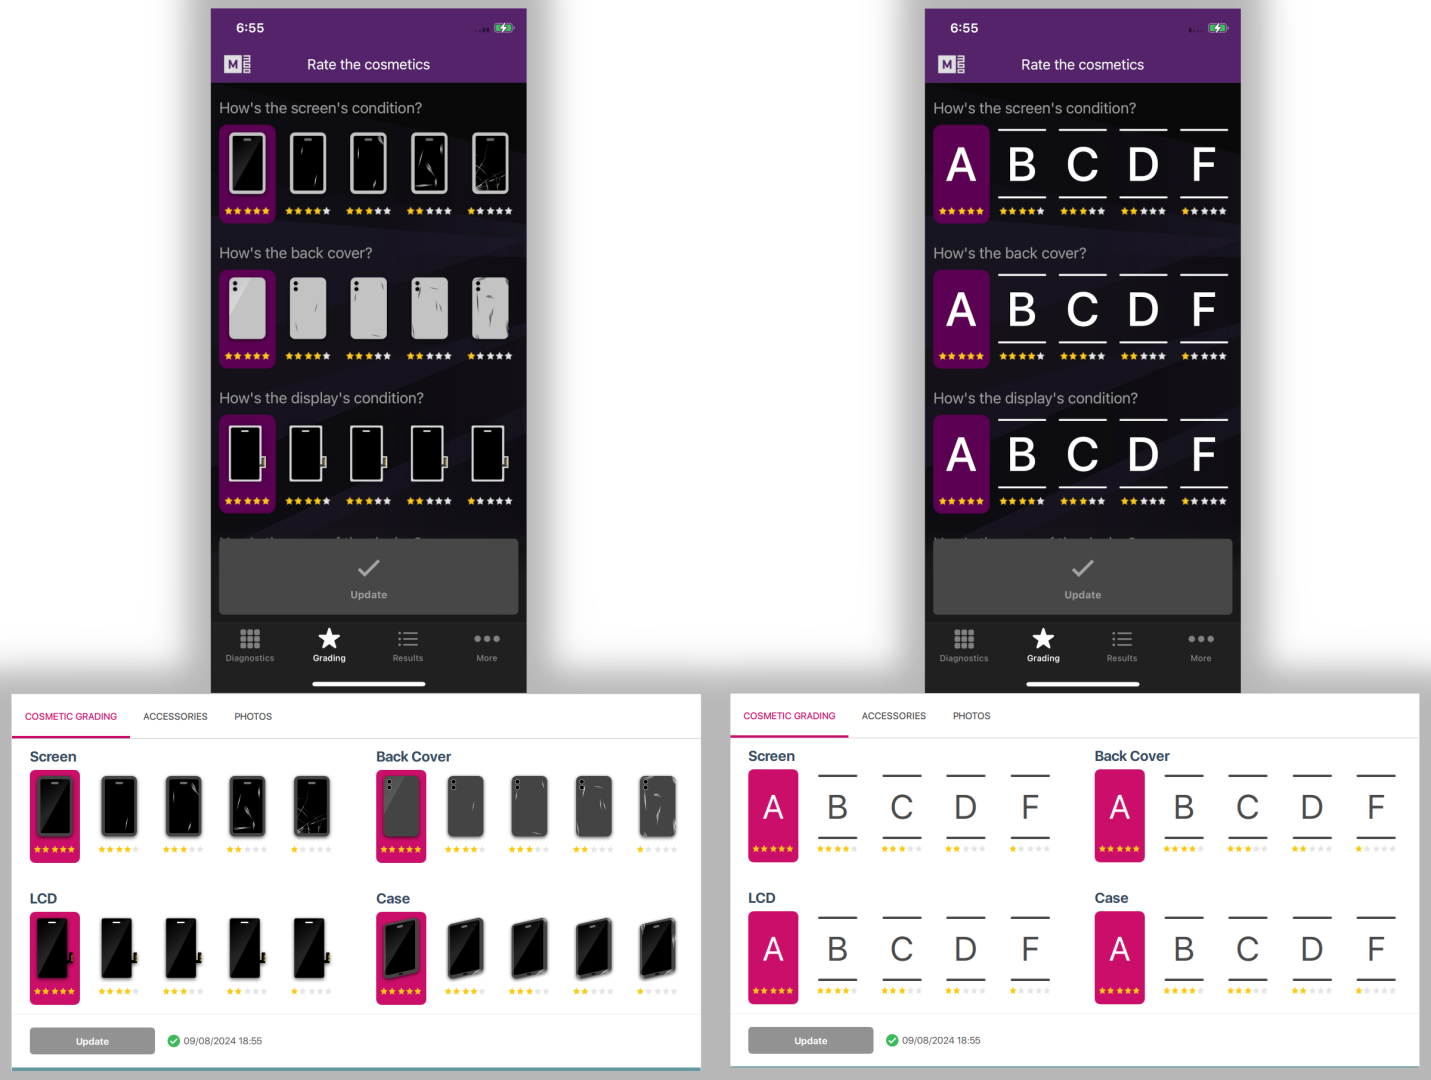
2 formats are available for grading in M360. Changing this setting will affect both the PC app and the mobile apps of any device you connect.
- Visuals - Descriptive icons with a 1-5 star rating system
- Letters - Simple, traditional A-F rating system
Export
Report Language
This is the language used for all exports. By default this is set to whatever your M360 app language is, but you can overwrite that separately here.
Preview
While adjusting your printer settings you can see a simplified display of how the report is set up. You can also press the Test Print button to see an actual version of the report, printed in whatever way you chose. The report is filled in with placeholder data.
Printer Settings
These settings affect Report printing, which requires A4 paper. For labels, check the Print Label settings documentation.
Printer - Choose a printing method. Any printers you have added to your computer will show up here, as well as these default options:
- View sample PDF - Quickly opens a PDF of the report in your default PDF viewing program
- OneNote - Sends the report to your OneNote app if available
- Microsoft Print to PDF - Saves the file to a PDF as if it was printing
Print quality - You can choose a printing DPI here, based on what DPIs are available for your selected printing method.
Copies - You can print multiple copies at once of a report
Double Sided - Prints the second page of a report to the back of the previous page, rather than a new sheet.
Coloured - Turning this off will print the reports in black and white.
Result Export Settings
When exporting, you are always prompted to choose a save location for any files you are saving. Here you can set a default path to where those reports are saved to. If you leave it empty, the default location will be wherever you last saved a file to.
CSV Export Structure Settings
All data available about a device can be exported in a CSV, where it will be organized into Rows or Columns depending on your choice here. You can also toggle whether you want headers for each data set, which indicate what each set of data is.
Print Label
In this menu you can view, edit, and manage your label templates, including default ones. Press Create New to enter the Label Designer and make a custom label. If you click a label, you can see the following:
- Preview - With nothing selected, you will see the text “Please select a label template from the list”. With a label selected, you will see a preview of it.
- Set as Default/Default - When selecting a label to export, the default one will automatically be selected first from the list. You can see if a label is set to default by the pink star next to its name, as well as the “Set as Default” button turning to just “Default”. Press the Set as Default button to switch the default to the one currently selected.
- Test Print - Pressing this button will use your current printing settings and print the label using placeholder data.
- Edit - Opens the Label Designer to edit the currently selected label
- Delete/Hide - For custom templates, you will see a Delete button that permanently removes the template (after confirmation). For built-in templates, you will instead see a Hide button, which removes that template from the options when exporting. You can always choose to unhide a template later.
- Margins - You can adjust the template’s printing margins here. Make sure to save your settings after changing these to actually have them take effect!
- Printer Settings - Select a printer or printing method, and choose options for it. You can press the Refresh button to help find any printers you have recently added.
- Apply to ALL Labels - Pressing this button copies all printer and margin settings to all other labels.
Device Identification
If you work with many devices at once, you may find it useful to be able to quickly identify which is which when handling their phonecards. While the app is open, you can use this Device Identification feature to pop up a display of customizable information.
Show when diagnostics completed - Enabling this option automatically brings up the identification screen on any device on which diagnostics have been completed.
Identify devices upon clicking their port boxes - Enabled by default, with this option you can click the port number on any phonecard to bring up the device identification screen on the relevant device.
Automatically close after a timeout period - You can choose to have the device identification screen disappear after a set amount of seconds, which you can adjust below the checkbox.
Information/Display Mode - Here you can customize what data is shown on the device identification screen and in what format. Press the “+” icon to add additional information, or the trash icon to delete one.
Driver Manager
If you run the program as an administrator, you can use the Driver Manager to install and uninstall drivers directly from M360. Here you can see the current status of each driver, whether they are installed and what version they are installed as.
You can select multiple drivers at once, or all of them easily by pressing the Select All button. The install and uninstall button in the bottom right is to be used for handling multiple drivers at once. Alternatively, you can press the Install/Uninstall buttons next to each driver one by one.
Port Manager
Whenever you connect a device to M360, it will receive a port number helping you identify which USB Port the device is connected to. You can customize the labels for these ports here. To remove custom ports, press the forget button next to one.
The Port Manager updates live, so you can always see all connected devices and their ports.
Licences
For further information on how licences actually function, check out our Licence FAQ.
Licence Details
Here you can see the current licence for this account, and its detailed information. Pressing “Manage Subscription” will take you to your online dashboard. “Refresh Details” updates your licence information in case you had made any changes through your dashboard. Logging out and in also refreshes this information.
Licence Upgrades
You can view your upgrades here, as well as their details. To purchase upgrades head over to our store page.
Available Tokens
Here you can view your available tokens with your current licence, which are used when performing relevant procedures. Tokens do not carry over between renewals of your licence, they are reset to their original maximum value. Tokens you purchase with upgrades however, stay until used.
Attached Computers
Depending on your licence type, you may be able to attach more than 1 computer to your licence. Here you can view what computers you have attached, and detach them if you’d like.
About
View version information, company information, and other details about M360. You can also access the changelog and check for new updates in this menu.
Operator Settings
To see Operator Settings, you must be the Manager of at least 1 account!
Operator settings contain much of the same settings as your own settings, so for information of those check their documentation. What sets apart Operator settings from the standard ones, is that changing these does not affect your own account, but instead all accounts for which you are a manager for. Here's how it works:
- Next to each setting that you can adjust, you will find 2 options, Enforce and Default.
- Default - Each setting which you intend to apply to your Operators should be selected by pressing the Default checkmark. When applied, all of these settings will be updated for Operators, but they can then still overwrite this in their own account.
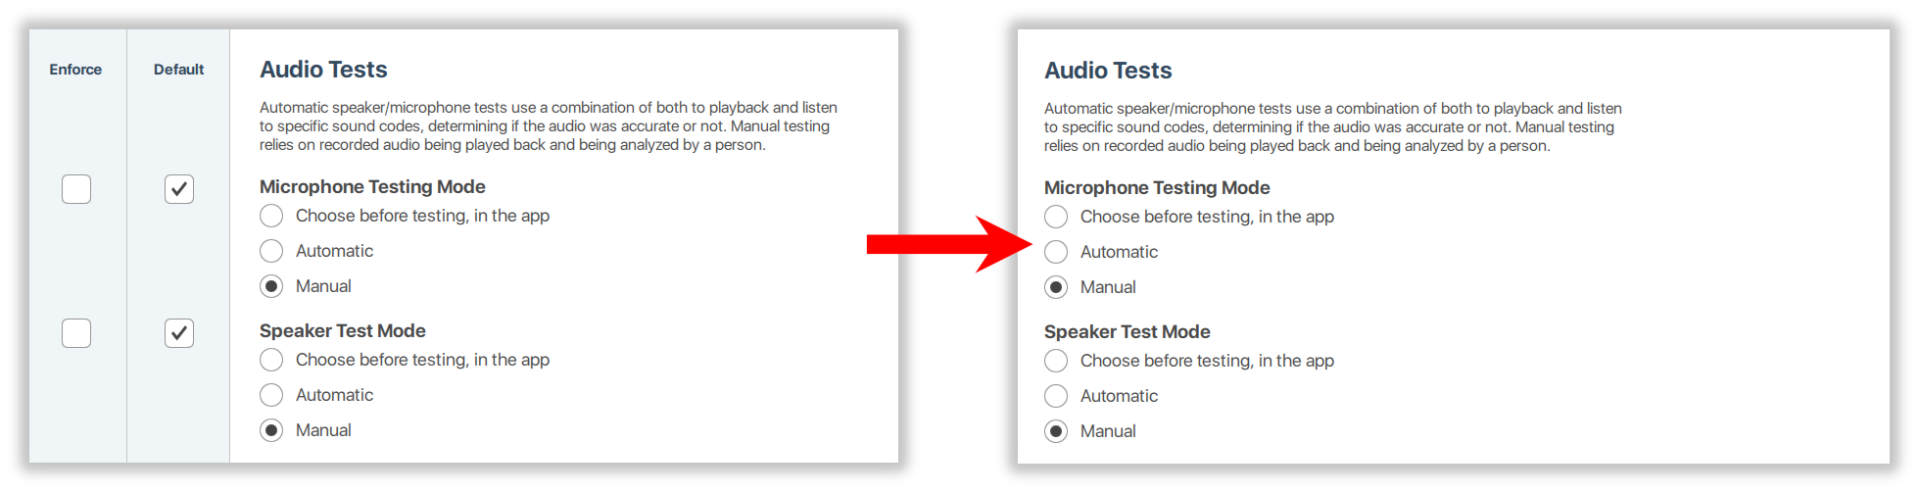
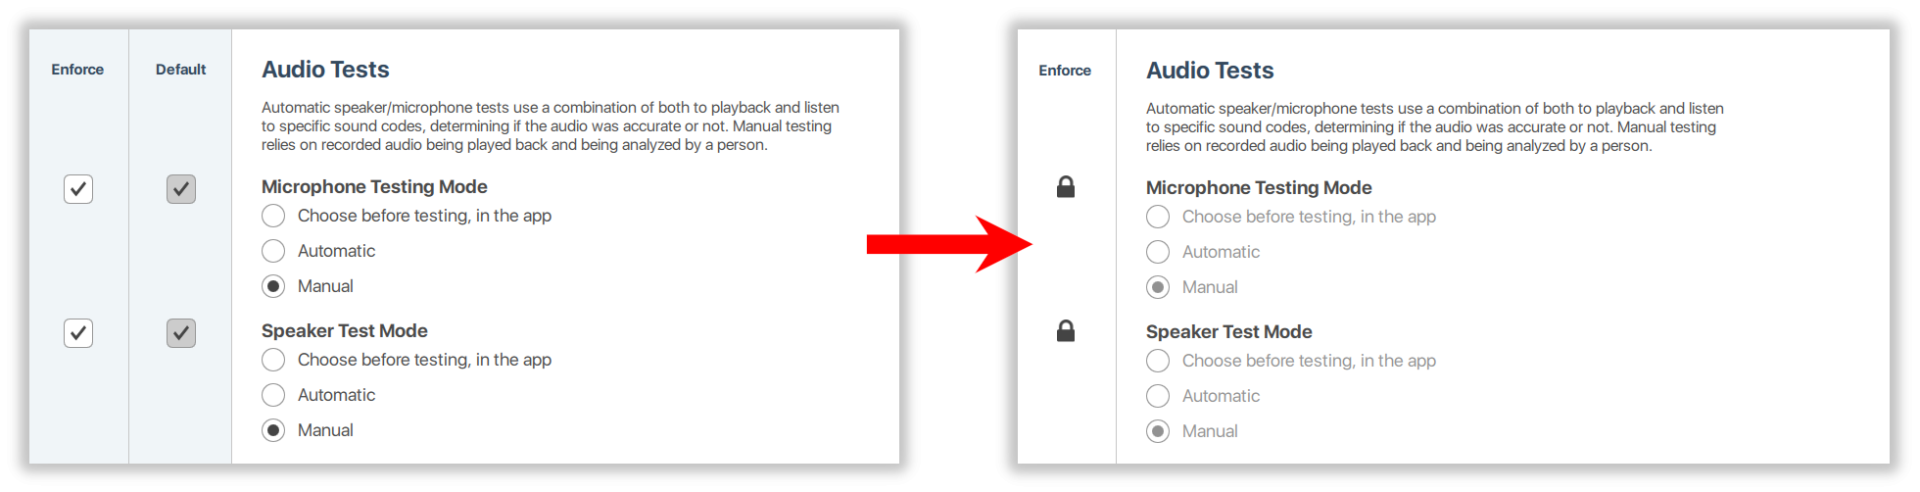
- Enforce - If you wish to lock certain settings and prevent an Operator from changing them, press the “Enforce” checkmark. When applied, these settings will be updated for operators, and they will be unable to change it.
- Apply to Operators - After making your selection of Defaults and Enforce, press the Apply to Operators button to confirm the changes. Each setting which you did not select will not be affected in their accounts.
- Import My Settings - To quickly copy your own personal settings into this menu, press this button.
- Revert to Last Applied - If you are unsatisfied with the changes you have made here, you can press this button as essentially a “Cancel”, which will reset to the last time you pressed Apply To Operators